
How to Install a Thermostatic Mixer Shower

Mains-fed shower methods can prove tricky in several situations? flushing the toilet or even managing a hot faucet in an alternative area of the house can make your shower run freezing cold or even scalding hot. In case you are in search of a brand new system, you need to choose a thermostatic mixer shower to make sure a comfortable and safe taking a shower encounter. This particular shower type will allow you to pre set the heat at the ideal level of yours, and keep that temperature irrespective of water use elsewhere in the house.
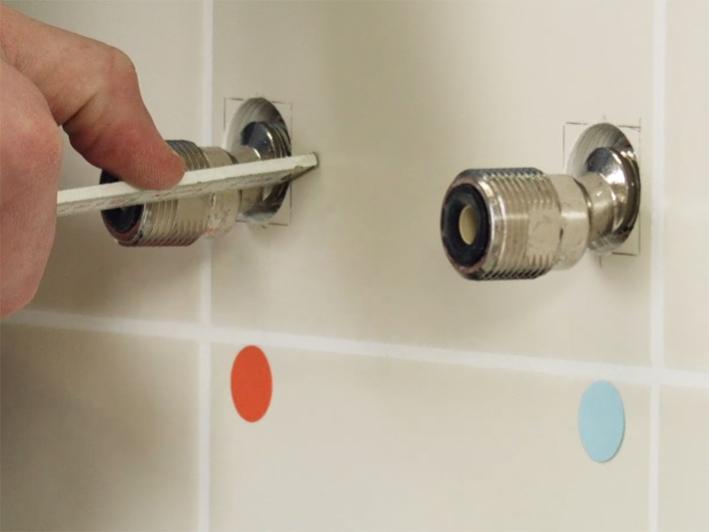
Decide where to draw the cold and hot water supplies from
At first, determine where to draw the cold and hot water supplies from. In case the shower of yours is becoming a fit above the bath, you can tee into the faucet supplies. In case you’re setting up the thermostatic shower valve into a shower enclosure, you can tee into the nearest hot as well as cold pipes, which are found under floorboards or perhaps concealed to a cupboard. Trace the pipes back from the closest hot and cold bathroom faucets to check out which is which. The water flow could be experienced throughout the pipe whenever the faucet is working. Run each faucet? you will can determine the warm water pipe as it heats fairly.
Isolate the supply
Right after determining where to draw the cold and hot water supplies from, the work can start, but only one time the supply continues to be isolated. To do so, turn off the stopcock, as well as open the cold and hot faucets to drain away the water to the pipes.
Run the pipework towards the shower
after the source has been isolated, tee into the cold and hot supplies and run the pipework towards the shower. Sticking to the directions provided with the valve, feed the cold andhot water supplies to the sides? hot is on the left with cold on the right.
Top Tip: it can operate clear plastic pipe under floorboards and behind stud walls for a hassle free plumbing remedy. Use pipe inserts at any joints to avoid plastic-made pipe from deforming.
Use a shut off valve on the cold and hot supplies as close as you can to the shower. It’s much easier to tighten up compression type joints on a copper pipe, therefore slot a department of copper pipe into the conclusion of the clear plastic pipe runs. As soon as it has been done, set the clear plastic stop finishes on the pipes, turn the stopcock back on and check for water leaks on the brand new pipe runs.
Flush the pipework through to remove any dirt
To stay away from harming the shower valve, flush the brand new pipework through to remove any dirt moving throughout the water. Next, you are able to switch off the stopcock.
Work out just how much pipe outlet is needed
Role the shower valve against the wall where it’ll be fitted, and mark off the depth of outlet pipe required to permit it to fit flush to the wall.
Cut the outlet pipes
Today, cut each pipe to the necessary length.
Top Tip: use a good quarter tubing cutter, and that is particularly suitable for compact spaces.
Drill the holes
You are able to today mark up and drill the holes for the valve. If you are drilling into tiles, it’s recommended to work with a diamond tipped drill.
Top Tip: make use of a water cooled drill manual to create best holes fast.
Add a collapsible olive to each inlet
Put in a collapsible olive into each inlet on the valve, securing it by screwing the retaining nut on by one turn.

Align the valve with the supply pipes
Arrange the thermostatic valve with the supply pipes, ensuring they completely slide into the inlet pipes. From there, screw the shower valve to the wall, tightening the retaining nuts using an adaptable spanner. Switch the stopcock back on, as well as check the inlet pipes for leaks.
Fit the majority of the shower kit
A flexible hose or maybe solid riser pipe will carry the flow of cold and hot water from a totally exposed shower valve to the shower head.
In case the shower kit of yours utilizes a flexible hose, you simply have to link it up and fit the bracket which keeps the handset in position.
In case you’ve a riser pipe, it may need cutting to length at first, to fit the height of the ceiling of yours. In case you do not have to cut it down, determine the level of the recess that the pipe sits in on the valve, then on the bracket which secures the roof of the riser.
Take measurements
Utilize some double sided tape to the best bracket, sticking it at the height you would like it to be above the shower valve. Determine the distance between the bottom part of the bracket as well as the valve’s top mounting nut. Include this measurement to those produced in the prior step, and cut the riser pipe to the correct length.
Top Tip: make sure you work with a pipe cutter to cut the pipe, instead of a hacksaw.
Test the riser pipe fits
Test that the riser pipe works in between the valve as well as bracket, as well as make use of a spirit amount to be sure it’s vertical. Mark up the best bracket mounting holes prior to drilling as well as plugging.
Completely fit the riser pipe
Today the riser pipe are able to be completely fit, and you could firm up the bottom and top nuts. Specific shower systems include an extension piece which connects to the riser’s top bracket? this in turn takes the shower head. Install this and screw the shower head on. Run the shower to check out for leaks. Guarantee the thermostat works by switching the shower faucets on, as well as ensure the shower temperature continues to be constant.

How to Fix a Slow Flushing Toilet
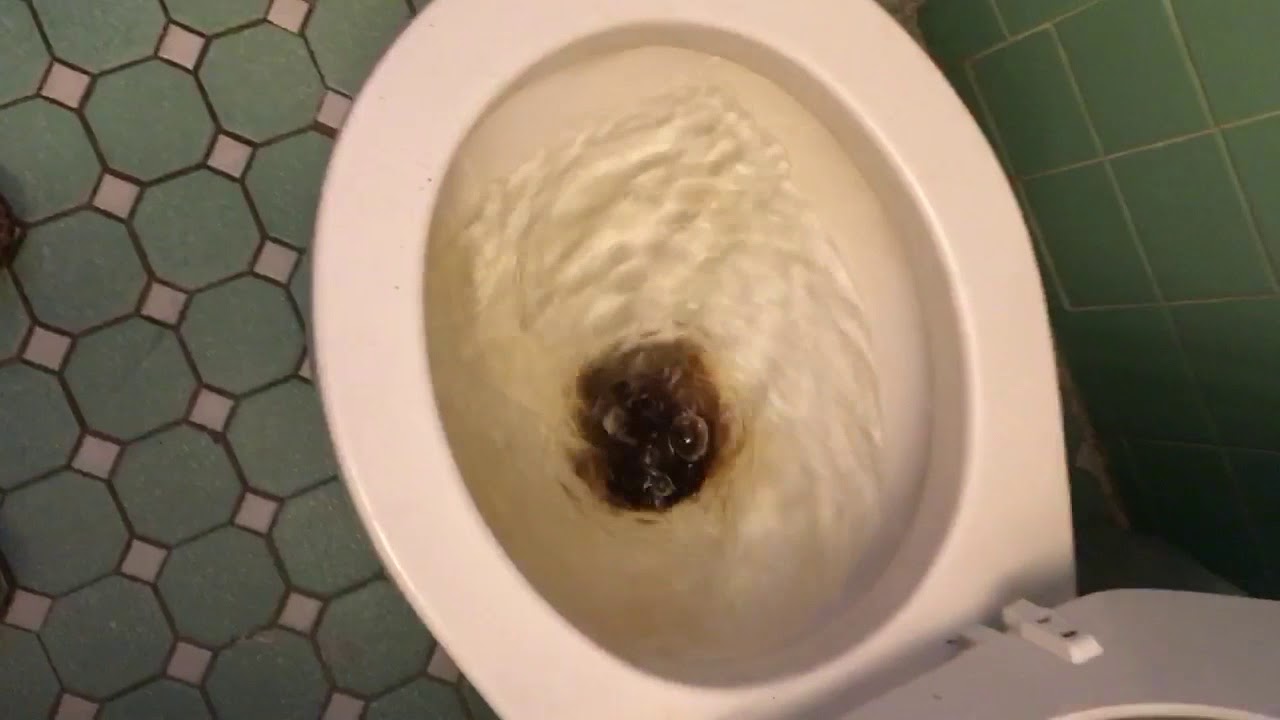
Is your toilet flushing far too, or perhaps not clearing? A gradual flushing toilet has to be attended to as disregarding the issue can result in the toilet becoming clogged, which isn’t one thing you wish to happen.
In case you’re experiencing issues with a slow flushing toilet you will find 3 primary things you have to look at, the toilet tank water level, the water inlet as well as blockages. Odds are that by examining all these you will be ready to identify the issue and solve it.
To ensure the bathroom tank water level is correct
It might appeal to lessen water in the toilet tank from an economic and water conserving point of view, however, not getting plenty of water in the container can cause issues with flushing. In case you lift the lid on a toilet tank you must be ready to identify if you have to increase the water level.
If you look within you must be able to visit a hose operating in the centre of the container. This’s an element of the bathroom flush valve. Attached to it you must be able to see the bathroom fill tube as well as the toilet flapper. To identify it vertical tube is essential as the water level in the toilet tank must be at around fifty percent an inch below the top part of the hose. Often you will find a signal on the edge of the interior of the tank that will help you determine the exact proper level.
If you identify the water level is too low it is simple to solve the problem. At the edge of the toilet bowl you will find sometimes a fill valve or maybe a ballcock. A fill valve toilet features a cylindrical float which surrounds a cylinder, while a ballcock toilet possesses a ball float on the conclusion of an arm. It may modify either of these to sometimes raise of lower the amount of h20 in the tank. In case you would like to increase the water level you must find as well as ease the keeping screws or clips to ensure you can generate the fill valve or even ballcock.
Once you’ve created the adjustments you have to purge the toilet a few of times to guarantee the water level is right and it does not raise too much trickle in to the fill tube; it wastes water.

Checking for sediment in h2o inlets
In case there’s no issues with the amount of h20 inside your toilet tank you need to check out the inlet included in your toilet bowl which takes the drinking water from the container on the bathroom. Over time sediment can generate in this particular inlet and also minimize the flushing effectiveness of the toilet of yours, as it impairs the flow of water. It is a wise idea to place on a set of waterproof gloves and provide the water inlet a great clean to eliminate any sediment.
Offering with blockages
In case the issue isn’t with the toilet tank or maybe the water inlet it is very likely that there’s a blockage someplace that’s adversely impacting the flushing potential of the toilet of yours. You are able to use a plunger to eliminate the blockage and restore the normal flushing power of yours. In case you do not possess a plunger next one tip is using a mop, similar object or coat hanger with a clear plastic container secured firmly with the end; which has the identical impact as a plunger.
Sometimes a gadget continues to be inadvertently flushed down the bathroom and it is difficult to budge; this’s when you might have to utilize a toilet auger. This particular device includes a flexible cable that you supply down the drain with a hand crank. The cable is strong at the head of its meaning it is able to dislodge whatever obstruction is leading to the issue. After it does this you must see that power returns to the toilet flush of yours.

Bathroom Decorating Ideas Guide

Have a look at bathroom decorating ideas guide if you are thinking to do bath decor with shower curtains, bathroom furnishings, bath flooring, bathroom furniture and other accessories. Find handy bathroom decorating tips to beautify your bath.
